Friday, June 25, 2010

Cutie Patootie Cards...By the Inch!

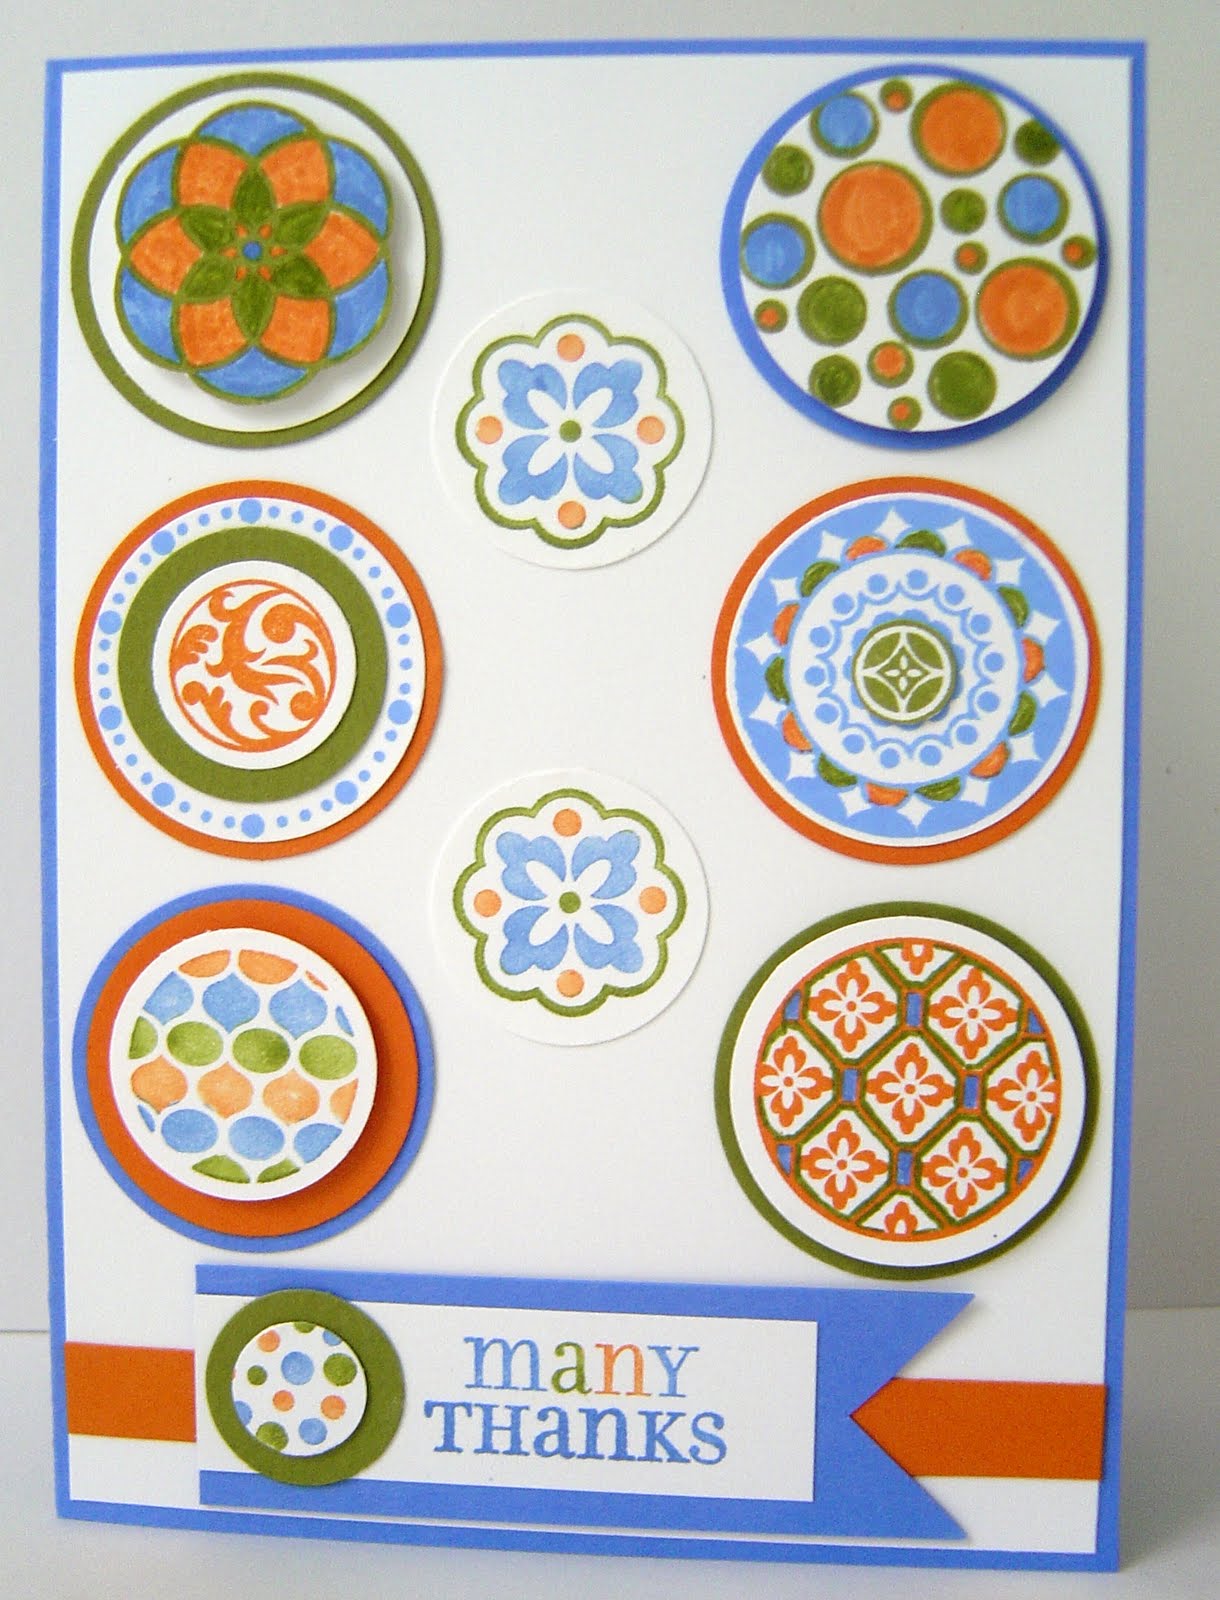
Oh.My.Word. I'm pretty sure I've never been so excited by a Hostess set as I am by the one I'm going to share with you today. It's called Cute by the Inch, and it's a Level 2 Hostess set in the forthcoming 2010-2011 Big Idea Book & Catalog.

This set of "inchies" gives you nine images in a variety of styles. I pulled out three of the new colors that have been added to the Core Collections to use as my palette. They are: Cherry Cobbler, Marina Mist, and Daffodil Delight. I added Wild Wasabi, a former InColor that has also been incorporated into the reorganized group of colors as part of the Subtles Collection.

The cards are 4"x4". I think this is the best size to accentuate the 1" square designs. As part of the Color Renovation, SU! sent all demonstrators a complimentary sheet of each of the new Core Colors so that we could experiment with them before they were available through the catalog pre-order. Just another perk of being a representative of this wonderful company!


I kept the design of each fairly simple. I used direct to rubber coloring--with the complementary SU! Stampin' Write Markers that each of these colors has!--on the first one and matted it with two of the colors and a Whisper White border punched using the Scallop Trim Border Punch. See how it doesn't take much to make a statement with these?

The second card was a little more involved, requiring the Stamp-A-Ma-Jig, even though I ordered the clear mount stamps. Just wanted to make sure I was getting the tile image just where I wanted it! I was amazed how much detail the designer packed into such a small space. This really came to light when I colored it with markers. WOW! And it really wasn't hard. The brush tip made it easy, although I needed some good direct light to help my aging eyes! This is so elegant it didn't even need a sentiment.

I was delighted when the idea for the third card worked out like I thought it would! I omitted the word "friends" when I colored the stamp in each of the four colors of my palette, then added it when I used all the colors for the focal image. And this Cherry Cobbler color is such a deep, rich RED. I'm already sure I'm going to be using it for my Christmas cards!

The last card just makes me smile because it evokes memories of grade school and learning to write my letters. I had some Designer Series Paper that mimics like notebook paper (retired Loop to Loop), so I capitalized on that look and kept it really simple. The ribbon is left over from when WW was an InColor and the three hearts were punched with the Heart to Heart Punch to serve as an accent. I matted the DSP with a very tight mat of Basic Black.

There are FIVE more images I haven't experimented with yet, but I trust you've caught my excitement about this set. You can only get it FREE by being a hostess with workshop sales of $300 or more in merchandise (before shipping and handling and taxes). There are SOOOOO many cool new things in the 2010-2011 Big Idea Book & Catalog that you and your friends will want to have that I urge you to get out your calendar, choose a date, and put out the word that you're going to have a stamping event! We'll make 1 of these cards of your choosing and I'll highlight as many of the new things as I can. Contact me through the comments or email me at jenn@nahrstadt.com.

The first hostess to partner with me to host an event will receive the Purse-onlly Yours Paper Purse and 4 cards I featured here on my blog! Contact me today! The new catalog will be available to order from beginning July 1st!

Thursday, June 17, 2010

YouTube Videos Posted of Father's Day Cards

My videographer Aldo Nahed has finished the uploads of the 2 videos he filmed of me making the Father's Day cards I posted about here. Check them out!

Made with all SU! product

Made with items from around the house

Thanks, Aldo!

Check Out my New Purse!

What woman do you know who doesn't like a new purse, especially if it's stuffed with handmade cards?

Fellow demonstrator Becky Roberts created this amazing tutorial for a paper purse that holds four cards and envelopes. I purchased it and followed the fabulous, detailed with photos instructions a few days ago. WOW! What a unique item to have in my gift closet.

I'm offering my local stampers the opportunity to make this purse and the coordinating cards next Saturday. I used some of my favorite Designer Series Paper, Urban Garden, for this project, and paired it with Basic Gray card stock. Don't you just love the "buckles" that hold the handles on the purse? They're made using metallic silver card stock and black brads. And that pocket on the front? It's functional, complete with a velcro closure! Perfect for holding a little gift card for some shopping...

The cards used the same color scheme. A girl's gotta have coordinating accessories, right? As a demonstrator, I was able to preorder a few sets from the soon-to-be released 2010-2011 Big Idea Book & Catalog, and Because I Care was one that came FREE with my order! (You could also get it free, contact me to find out how!)

The first one uses a .75" square punch to highlight details of the hydrangea stamp image that comes with the set. I stamped it with Basic Grey classic ink, then punched out details that I wanted to highlight. Then I stamped the image again and layered the small squares on top. I wanted a look that mimicked a scientific botanical textbook illustration.

One of the things that was also delightful about preordering from the upcoming catalog (being released July 1) was getting a set of Stampin' Write Markers to complement the returning InColors that are being added to the line permanently.

BAJA BREEZE is coming back! I was down to scraps in my stash of card stock, and now I don't have to scrimp anymore. Having the marker made coloring the flower image so easy, and the journaling tip allowed me to place color just where I wanted it on this fine line image.

With the second card, I stamped the hydrangea in Basic Grey again and hand colored the image with my BB marker and an Old Olive Marker. You can double-click on the card to see it up close so you can see that I didn't color the whole image, just the line art. It took a little time, but I love the final result! The thank you is also part of the set and was stamped with BG and punched with the Label Punch.

My inspiration for the third card was Diana Gibbs' card. She used the image to make a patterned background paper, and I kept mine simple and added some BB striped ribbon and created a tag using the other sentiment from the set. The little flower that accents the tag is also one of the images. You may also be able to tell that the floral piece is spritzed with Vanilla Smooch Spritz, another new product that was first released in the Summer Mini and will be carried over into the new catalog. It adds just a hint of shimmer and I love how easy it is to apply from its little spray bottle.

The last card features a slightly different take on the image. I inked up the flower head with BB and stamped it onto BB card stock and cut it out. Then I repeated the process using OO and matching card stock for the stem and leaves. I mounted it all with Stampin' Dimensionals on Whisper White card stock. The BG background piece is stamped completely with the hydrangea image, which creates a cool look.

See how versatile this set is? It's only available to hostesses, so consider now partnering with me to plan a catalog party or a private class so that you can earn it for FREE with orders of $150 or more. Trust me, there's so many cool things in the catalog, you could spend that all by yourself!

If you're local and want to attend the class, the cost is $28 and includes a printed copy of the instructions, the purse, and the four cards with coordinating envelopes. Please RSVP by Monday, June 21.

Saturday, June 12, 2010

For the Graduate

This year demonstrators across cyberspace have made it easy for me to make cool cards for the graduating seniors in my world. Not that there are many, but it's good practice for 2013 when mine and his buds will be grabbin' their sheepskins.

Dawn Olfchefske posted this card on her blog, complete with video instructions. The original design is from Pam Hoffman. That's how the crafting world works, and I love how generous everyone is! The video takes a LONG time to load, but it's worth it for the step-by-step tutorial. She also shares how she made the tassel. I made mine using the silver taffeta ribbon and following the same directions.

Our high school's colors are black, silver, and purple, and I enhanced the card design to incorporate them. The base is Going Gray, the mortarboard is Basic Black, and the mat on the hat is Elegant Eggplant. The letters (not SU!) are embossed in silver. I'm thrilled with the look!

The inside reveals the cool fold that makes this card look like a mortarboard (how many times can I use that word in this post?). I like that there are two places to put a message. I used two stamps from Live Like You Mean It and the Congratulations from Well Scripted. These were inked with Elegant Eggplant and Going Gray. There was even room, thanks to the fold, for a little diploma.

I created a very simple money holder with the bottom Whisper White piece of card stock by not putting adhesive on the top. I love how the design hides the cash!

The grad is going to Georgia Tech and majoring in pre-med. Kudos, Melissa! Her brother is in my son's class, so I'm sure we'll hear about her freshman experiences in due time.

Friday, June 11, 2010

Baby GIRL Card

It seems everyone I know is having BOYS this summer, so I was thrilled when I read the birth announcement on Facebook of Neelam's third little girl, Mira. Neelam and I met three years ago at the annual SU! convention, when her two oldest girls were not quite sure they were happy about Mommy being away from home for three days. Mommy, though, certainly was! Now I'm sure those not-so-little-anymore girls are beyond excited to have their little sister join them at home.

I've always struggled with baby cards, and I don't tend toward pink or frilly, given the choice. As I thought about what stamps to use for Neelam's daughter's card, I wandered around my craft room and my eyes fell upon So Many Scallops, a retired set that I'm planning to sell that has a baby image. I pulled that one out of the case, and I also picked up the daisy design that's part of the set.

I chose Kraft and Pretty in Pink and Whisper White as my color scheme and the base is 4.25" square. I ended up liking the idea of pink daisies better than the image intended for use with baby cards. I had to hand color with my Pretty in Pink SU! Marker the flower, so as not to ink the non-baby related words in the center. To fill the center, I used a .75" circle punch and some retired striped Kraft Designer Series Paper.

I like to customize baby cards whenever possible, so I pulled out a small, non-SU! alphabet and stamped the baby's name using Close to Cocoa ink. Can't WAIT for the new Kraft (renamed Crumb Cake) ink pad to arrive with my order next week!! It's long overdue.

For the interior, I used the scallop circle punch and made some daisies. I stamped one of the circles from long-retired-but-still-one-of-my-favorites Riveting and created the center of the flower with it. The leaves are from my 2-step Bird Punch, which will be returning in the new catalog that debuts July 1. Can hardly wait for that either!

Lastly, I spritzed the entire front of the card with a new product called Smooch Spritz. It gives a nice shimmer to any project, although I think I laid it on a bit thick on this one. I didn't know how it would dry, so I just went with my Mom's motto: If a little's good, a lot is better! In my opinion, it's too much, but oh well.

I have another graduation card to make for a party we're going to this weekend, so be on the lookout for that.

Thursday, June 10, 2010

Double Birthday Wishes

My twin nieces will be FIVE on Father's Day. It's hard to believe they're going to be going to kindergarten in the fall!! As I was sorting through sets I'm contemplating selling, I came across retired Wild About You and decided to ink it up to see if I still had any love for it.

I started with this card as inspiration (scroll down to see the card), but after I'd stamped each of the animals once, the thought of animals coming TWO BY TWO occurred to me, and it seemed like a subtle nod to the twins, so I went with it.

A LOT of cutting later (I think this card took more than an hour), I had the animals mounted on Whisper White and matted with returning former InColor Pink Pirouette. The colors for the animals include Perfect Plum, also returning (YIPPEE) Baja Breeze, So Saffron, returing Wild Wasabi, and Soft Suede. These colors, with the exception of Soft Suede, are part of the new Subtles Collection created by SU!'s Color Renovation. For the record, this card is 5" x 7".

I was also inspired by Teneale Williams' amazingly creative use of Party Hearty to create a banner, and this became a core element of my card.

The party hats from the set were stamped with Pink Pirouette and cut out. Then the circle "Celebrate You" from the set was stamped multiple times in each of the colors except Soft Suede. Using my 1/4" circle punch, the letters to spell "celebrate" were punched out and adhered to the now-pennants with glue dots. (If you scroll through Teneale's post, you can see a photo of these elements.)

I added the asterisk design from the center of "Celebrate You" stamp and tied five bows using 1/8" non-SU! sheer pink ribbon. I can hardly wait to send it to them! They'll be visiting Disney World on their birthday, and I'm sure that this year's celebration will go down in their memory as one of the best!

Wednesday, June 9, 2010

Thanks and Farewell

A guy Bob has served as a volunteer under at church is leaving to "spread his wings" and try new opportunities. I thought it would be nice to thank him for the way he has led with humility and sincerity, and wish him all the best as he ventures out into the wide wide world. Besides this, Brian is one guy I know appreciates a good card; he sent out beautiful handmade Christmas cards with his roommates while he was in college.

As this was another time when I had need of a masculine card, I returned to Circle Circus. I was inspired by a color combination of Bashful Blue, Pumpkin Pie (retiring June 30), and Old Olive by Monika Davis that also utilized the stamp set. I also had this card by Mary Fish in my Google Reader saved category for quite some time, and that helped with the layout.

I end up getting carried away with this and it took much longer than I anticipated. But, that's what made it fun too! I stamped several of the circles and began adding color combinations with layers and with markers, and the final result is quite the piece of eye candy!

There are parts of circles popped up on Stampin' Dimensionals, parts cut out by hand, and others punched with various circle punches. I think I used 1 3/8", 1.25", 1", and .5"!

The message is from retired Lots of Thoughts, which pairs with retiring Mark the Date, and I colored direct to rubber to get the look I wanted.

Don't forget that there are many stamps and accessories retiring at the end of this month. Don't wait to peruse the lists and make your purchases. When they're gone, they're gone!

Tuesday, June 8, 2010

Sharing Sympathy

I HATE having the occasion to make a sympathy card for anyone I know. They're a real challenge, mostly because I want to create the right tone with color and text that will communicate how much I care for the person who is grieving. I don't like them to be really somber, but appropriately so, you know?

This card is for a friend of mine whose father died over the Memorial Day weekend. His death was sudden, unexpected, and followed on the heels of her mom's death less than a year before. She is a very strong person, but this has hit her hard. Her world changed in an instant.

I chose muted colors for my card--returning former InColor River Rock, Always Artichoke, and some flowers and two other patterns from Urban Garden Designer Series Paper. I had several of these flowers and so I cut out a full one, and then created two layers with portions of the others.

I don't have a sympathy stamp set, so I went with Thinking of You from Kind and Caring Thoughts. I inked it using Craft Ink and embossed it with Clear Embossing Powder.

Since my friend is part of my Starbucks community, my partners will have the opportunity to share some words of comfort with her and her family. I trust this and a hug will minister to her during this time.

Wednesday, June 2, 2010

Last Chance Stamp Set List Released

Last Chance Stamp Set List, the list of stamps sets that are being retired at the end of this month was released yesterday, and I'm making you aware of it today.

It includes some of my personal favorites. I just used Wanted to make some Father's Day cards and a great masculine birthday card, as well as this one featuring the cool scalloped circles technique.

I will also miss Mark the Date, which has great application for any card you want to create and feature a specific date. I used it to create Save the Date postcards for a friend who was getting married and to create a Valentine's card that's one of my all-time favorites.

Wow Flowers was one I purchased originally as part of a set called Simply Sent, which contains everything you need to make 10 cards. The lovely part about it was, I had the stamp set after all the consumables were gone! This is a fantastic, versatile little set, and I will miss it! The Flower Power Simply Sent Card Elements, stickers and card stock and other accessories that coordinate with the stamp set, is retiring too.

A Beautiful Thing has been around for quite some time, and I really like the sentiment. Be sure to check through the entire list to see if any of your favorites is on it!

Stampin' Up! - Last Chance Accessories List lists all the paper, ink, Designer Series Paper, ribbon, brads, eyelets, etc. etc. etc. that is retiring. It's an 11-page list, so be sure you don't miss something you may want after June 30. These will be available as supplies last, so don't delay.

If you'd like to order anything you see on the Last Chance Lists, feel free to click on my Shop Online 24/7 button at the top of my blog. Don't wait!