So, where am I headed? AUSTIN, TEXAS, baby! I invited myself to spend the weekend with Lydia Fiedler of Understand Blue and Neelam Kulkarni, fellow stamper and my roomie from SU! convention last summer. They were so excited about my wanting to come, and we're going to have a great time together! I'm sure there will be stamping, so I'll post whatever we create.
 Today's card is another that came from my perusing the SU! publications I had stashed in my stamp room closet. Those folks at HQ are so innovative! The flower was made using the small tag punch and it's SO easy. Let me explain.
Choose your favorite DSP (I chose a stash I got free during Sale-A-Bration) and select 4 patterns. Punch 2 of each pattern with the small tag punch. Fold each one in half vertically, making sure that the pattern you want showing as a "petal" in the end is INSIDE.
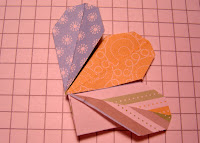
Placing the seam to the right, peel back the right half of the punched piece to the seam to create what looks like a wing for a paper airplane, making sure the bottom edge meets with the bottom left edge in a point. I'm not good at explaining this--just look at the pictures below and try it. You'll get it.

 That's all you do in the folding department. Repeat 7 more times.
Next, you have to attach the petals to each other. It's as easy as using that little tab that's sticking out at the bottom right. Put some mono adhesive on that, and align the left side of the next petal with the right edge of the petal that has the adhesive on it. It's critical that the points at the bottom of the two match. (Again, a picture is worth much more than this explanation.) The last picture shows what the flower looks like before the last petal is added. See how the center has no hole in it? That's just how you want it. You'll know if your petals haven't been folded correctly at this point, because you'll think you need more petals. You shouldn't.


 The rest is fairly straightforward. After the flower is completed, punch a 1.25" circle with a 1.25" punch, punch two holes in the middle so that it looks like a paper button, thread ribbon through, and tie it in a simple knot. That is the center of the flower.
Plaster the back of the flower with lots of mono adhesive and stick to the card base. It really makes a great card!


5 comments:
very cute flower. I will have to try it. Connie
Your "tutoring" is fine--can't wait to try it!
we did i on SAS and it is very easy and the results are very good
You rock, Jenn! Thanks for the great project!
http://www.splitcoaststampers.com/forums/showthread.php?p=14001984#post14001984
Nicole
www.thestampinlibrarian.com
This is adorable! I will definitely try this one. Thanks for sharing!
Post a Comment